Elmwood no more, long live Elmwood! Elmwood Electronics and PiShop are now together!
Please order via PiShop.ca, as we are no longer taking orders through this site.
More details are in our blog!

Initial setup guide & feature exploration for the OpenMV Cam M7.
{ Will refer to the 'OpenMV Cam M7' as 'OMVC' from now on. }
Things you will need to start...
- OpenMV Cam M7
- microUSB to USB (normal) cable
- Male to Male pin Jumper wire
- MicroSD-Card 16gig or 32 gig
Go to OpenMV.io and download the installer.
Testing done on Windows*
Install it. I know, not ANOTHER IDE, but this one is actually useful.

The OMVC documentation and tutorials are a locally installed website. This is something I am always happy about as inevitably I will be somewhere without wifi & need detailed pinout information. Eg. in a field setting up a remote motion capture wildlife photography rig, something the OMVC is a perfect device for. Offline documentation is also crucial if you like to periodically disconnect from the internet for productivity / sanity reasons.
First boot
THE DEVICE.
Accept all the windows device driver pop-ups.
The OMVC internal memory (like Adafruit circuit python devices) will mount as an external usb drive. If you double click to open it, you can see the Main.py file on the internal board memory.
It is a good idea to read over the documentation to grasp the ways in which it operates as a usb flash drive. It's slightly different than your common expectations.
I've summarized some of the key points :
3 ways OMVC will mount as a USB device :
Now we've got that out of the way, let's launch the OpenMV IDE !
It will likely immediately ask you to update the firmware by shorting the BOOT / Reset pins on the device with a (male-male) jumper wire.

I held the jumpers on an angle to ensure contact, if you were going to be a perfectionist, using a dual headed pogo pin adapter would be a better idea.
Follow the prompts & make sure you have a handhold you can maintain for a few minutes.

The device will need to be unplugged and plugged back in again.
When dealing with micro-circuitry, I always remove the USB cable to the computer and LEAVE the device-end inserted at all times to reduce wear and tear on the delicate board joints.
The blue LED will now flash as the firmware is updated. I didn't time it exactly, but it felt like about 30mins to re-flash the firmware. Results may vary with USB 3.0, I used a 2.0 port.
Once that is all set, you can now open the IDE and open 'helloworld_1.py' from the Example files.

Click Connect at the bottom left

The play arrow will now turn green. Click it.

You will see the camera display on the top right of the IDE.

If not, click the arrow on the middle far right to expand the live preview & color histogram (Red Green Blue channel values).
Let's have a look at some of the examples.

I really have to emphasize how important reading the #comments are for each example file.
For decent results with recognition, you need good consistent lighting.
These photos are mostly screen capped from the IDE in Windows and enlarged < ENHANCE ! >, THEN compressed for the blog, so don't consider these perfect examples of the camera capture quality.


Hair Elastic


Thankfully, It did not recognize it's own reflection, or demonstrate any other signs of self awareness, so we are safe for now.
HOWEVER it does have the capability to learn to recognize things, utilizing python machine learning, so that might be a fun future experiment.

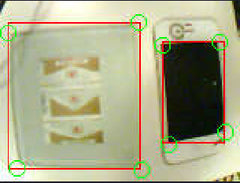
Facial detection works surprisingly well in properly lit conditions.
The default example file was able to identify two faces with different skin colors moving slowly in the same frame at the same time. You do need to have both eyes facing the camera, but there were surprisingly low false positives.
Facial recognition doesn't do as well in poor lighting. One could tweak the code tolerance values, but for low light uses, the optional Infra-Red lens would make more sense. This blog is more of a cursory run through the example files.
Barely scratched the surface of this exciting new platform and already very impressed. This is the best option if you want to learn camera based programming.
According to the documentation, the IDE previews camera frame rates at about half the capture speed. SDCard recording is at full frame-rate. Perceptually, I didn't notice any frame-rate loss on my laptop.
If you want to look at the python example files directly, the Examples are buried here in windows (will very based on OS):
C:\Program Files\OpenMV IDE\share\qtcreator\examples
One more bonus to using micro-python vs. C is the next time you plug in your M7 board (without the sd card inserted), you can open & read the .py file to remember what program the camera is running.
This is a huge improvement over the more traditional Arduino approach where you can't easily read the sketch that was previously written to the board.
The M7 captures at 640x480 but depending on the use-case scenarios sometimes what looked like 320x240 greyscale to maintain real time recognition performance for barcode or facial recognition. I'll have to dig into the documentation and do further testing before I can confirm that.
The only things close to this at the moment would be either
In further blogs, I will be exploring the various shields the OMVC can interact with (LCD, wifi, etc.).
To further explain one point, micro-python is a smaller, reduced function subset of the desktop and server language Python. Micro-Python is made specifically for single board circuitry devices.
The OMVC device works with Micro-Python, not normal Python, so installing desktop python should be redundant as OpenMV IDE should install all you need.
However, if you have NO standard Python on your system already, and at some point later on you want to learn more standard Python to improve your micro-python skill-set, it is generally recommended to go with the latest version (3.4 as of this blog).